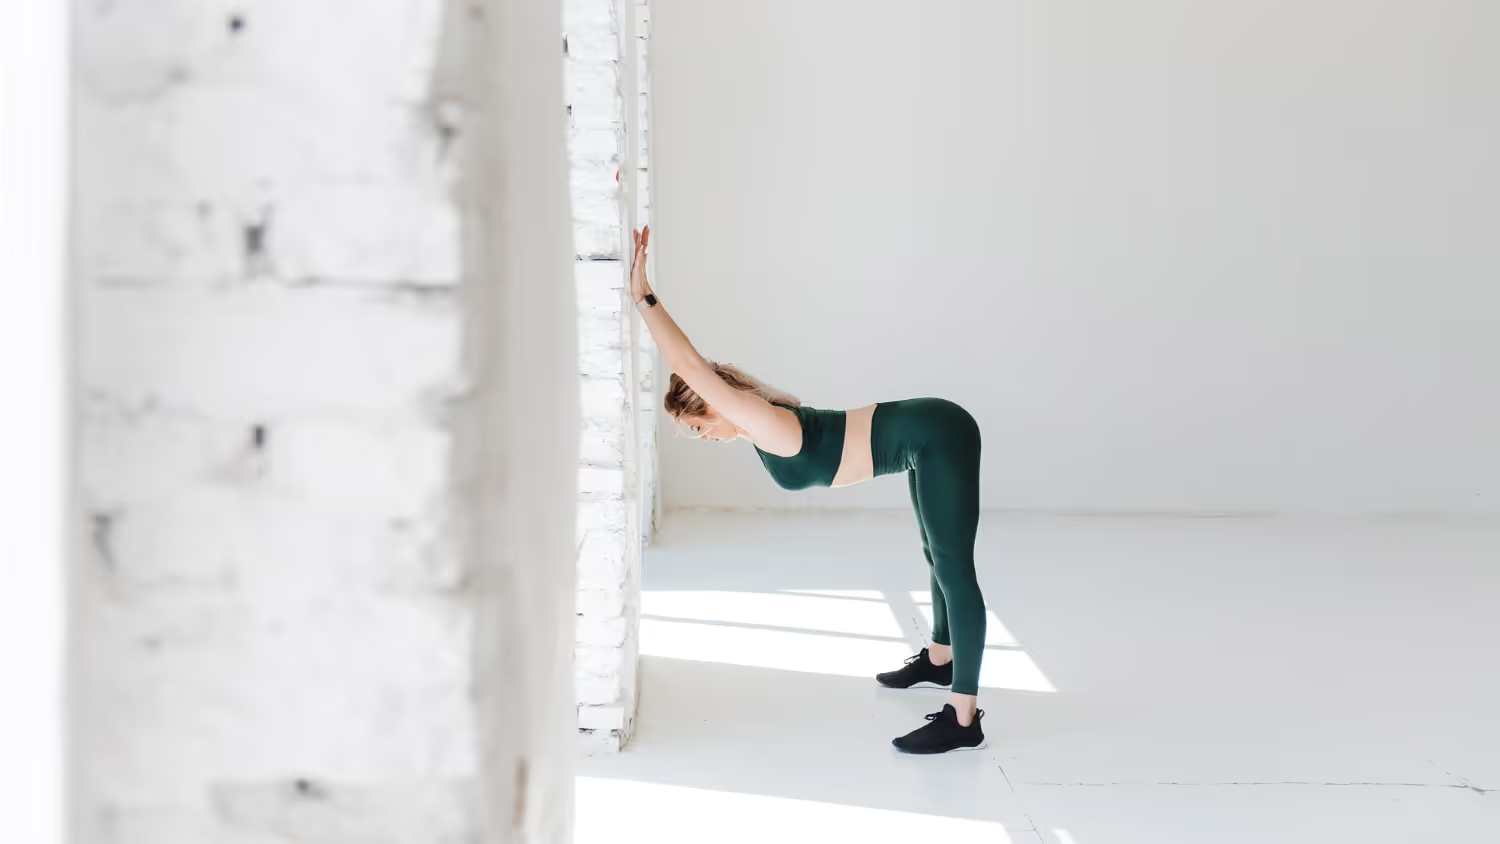
Chair Yoga that meets you where you are.
Get your plan
Chair Yoga that meets you where you are.
Get your plan
Chair yoga is a modified form of traditional yoga where practitioners perform yoga poses while seated in a chair or using a chair for support, making yoga accessible to women over 40 with limited mobility, joint concerns, or balance issues.
The benefits of chair yoga for women over 40 include improved flexibility, better balance, gentle strength building, reduced stress, enhanced posture, and increased joint mobility all without the impact or strain of floor-based yoga. This complete practice guide provides 30 essential poses, breathing techniques, sample sequences, and a progressive training plan to help you build a sustainable chair yoga practice.
What Is Chair Yoga and Who Is It For?
Traditional yoga made accessible with chair support
Chair yoga is traditional yoga adapted for seated practice or standing positions with chair support. Traditional yoga poses are modified so practitioners can perform them while sitting in a sturdy chair or standing with hands on the chair back for stability. This adaptation removes the need to get up and down from the floor while maintaining all core yoga principles: breath awareness, mindful movement, and body-mind connection.
The definition of chair support in this context refers to using a stable, non-wheeled chair as an anchor point for balance, leverage, or weight distribution during yoga practice. To begin your journey with structured guidance, explore our comprehensive Chair Yoga program.
Perfect for women 40+ with joint concerns or balance issues
Women over 40 experience specific physical changes that make chair yoga ideal. Joint stiffness increases with age, balance may become less reliable, and getting down to or up from the floor becomes more challenging. Chair yoga addresses these exact limitations.
Research on older women with knee osteoarthritis shows that chair yoga improves strength, mobility, and daily function. The chair provides support that reduces joint load while maintaining movement quality. Women with arthritis, osteoporosis, knee issues, hip sensitivity, or balance concerns can practice safely with chair support.
Also ideal for: office workers, beginners, injury recovery
Chair yoga serves multiple populations beyond women over 40. Office workers who spend hours seated benefit from chair yoga's ability to counteract desk posture and release tension without leaving the workspace. Complete beginners intimidated by traditional yoga classes find chair yoga less threatening and more approachable. Those recovering from injury or surgery use chair yoga as a gentle reentry to movement.
You don't need to be flexible to start
Flexibility is a result of chair yoga practice, not a prerequisite. The chair provides support that allows you to work within your current range of motion without force or pain. You start where you are, using the chair for stability and assistance, gradually building flexibility over weeks and months of consistent practice.
Benefits of Chair Yoga for Women Over 40
Improved flexibility without forcing or pain
Flexibility improvement through chair yoga occurs gradually through supported stretching. The seated or chair-supported format allows you to move joints through their available range without pushing into painful positions. Hip flexors, hamstrings, shoulders, and spine all gain mobility as you practice gentle, controlled movements with the chair providing stability.
Better balance and fall prevention
Balance improvement is a critical benefit for women over 40. Balance naturally declines with age due to changes in the vestibular system, reduced muscle strength, and decreased proprioception. Chair yoga builds balance by engaging stabilizing muscles during supported poses, teaching your body to maintain equilibrium while having the chair as safety backup.
Fall prevention results from this improved balance combined with increased leg strength and body awareness. Practicing chair tree pose or chair warrior variations strengthens the muscles responsible for catching yourself when you stumble.
Gentle strength building (especially core and legs)
Strength building in chair yoga focuses on functional movements. Core muscles engage when you sit upright, twist, or reach. Leg muscles work during chair-assisted squats, standing poses with chair support, and seated leg lifts. The resistance comes from your own body weight, modified by how much support you take from the chair.
This gentle progressive loading builds strength without the impact of jumping, running, or heavy weightlifting ideal for joints sensitive to high-impact activity.
Reduced stress and cortisol through breathwork
Stress reduction through chair yoga occurs via multiple mechanisms. Breathwork techniques activate the parasympathetic nervous system, shifting your body from "fight or flight" to "rest and digest" mode. Studies show that yoga supports nervous system regulation through mindful breathing and body awareness, reducing cortisol levels and improving stress resilience.
The accessible nature of chair yoga means you can practice stress-relieving breathwork anywhere: at your desk, in your living room, or during a break at work.
Improved posture from desk work or daily life
Posture improvement addresses the forward head position, rounded shoulders, and collapsed chest common in women over 40, especially those who work at computers. Chair yoga includes specific poses that open the chest, strengthen the upper back, and align the spine in its natural curves.
Seated mountain pose establishes postural awareness. Chest openers counteract rounding. Spinal twists restore rotation mobility. Over time, your default sitting and standing posture shifts toward better alignment.
Enhanced body awareness and mind-body connection
Body awareness develops as you practice tuning into physical sensations during poses. You notice where you hold tension, which movements feel restricted, and how your breath responds to different positions. This heightened awareness transfers to daily life, helping you notice and correct poor posture, unnecessary muscle tension, and stress responses before they become chronic.
The mind-body connection strengthens as you coordinate breath with movement, focus attention on specific body parts, and observe how mental state affects physical experience.
Joint mobility without impact or strain
Joint mobility maintenance is essential for long-term functional independence. Chair yoga moves joints through their full range without loading them with impact forces. Hip rotations, shoulder circles, ankle flexion and extension, and spinal movements all occur with the chair providing support that reduces joint stress.
This is particularly beneficial for women with osteoarthritis, where movement is necessary for joint health but impact must be minimized.
Getting Started: Setup and Safety

Choosing the right chair (stable, no wheels, proper height)
The right chair for chair yoga meets specific criteria. Stability is the first requirement the chair must not wobble, roll, or tilt. No wheels means standard office chairs are unsuitable unless you can lock the wheels completely. A dining chair, kitchen chair, or sturdy folding chair typically works well.
Proper height means your feet rest flat on the floor when you sit with hips and knees at approximately 90-degree angles. Too high and your feet dangle, removing grounding. Too low and you compress the hip joints. The seat should be firm, not deep cushioning that causes you to sink and round your spine.
Chairs with arms can provide extra support for standing poses but may restrict some seated movements. Choose based on your stability needs.
What to wear: comfortable, breathable clothing
Clothing for chair yoga should allow unrestricted movement. Pants or leggings that don't constrict when you bend or twist work best. Tops should allow you to raise your arms overhead without riding up or restricting. Breathable fabrics like cotton, bamboo, or moisture-wicking synthetics keep you comfortable.
Avoid slippery fabrics that cause you to slide on the chair seat. Skip restrictive jeans with tight waistbands. Long, loose hems on pants can catch under chair legs or your feet either hem them or choose ankle-length styles.
Footwear options include barefoot (best for feeling the floor and grounding), grippy socks with rubber dots, or supportive indoor shoes. Avoid slick-soled socks that cause your feet to slide on smooth floors.
Space requirements: minimal (just chair + small clearance)
Space requirements for chair yoga are minimal compared to mat yoga. You need enough room for the chair plus clearance to extend your arms in all directions and potentially extend your legs. A 6-foot by 6-foot area provides ample space for most chair yoga practices.
Clear the area of obstacles like extra chairs, coffee tables, or floor rugs that could slide and cause tripping. If practicing standing poses with chair support, ensure the chair won't slide on your floor surface use a yoga mat under chair legs if needed for traction.
Safety considerations and when to modify
Safety in chair yoga requires awareness of your body's signals. Sharp pain is always a stop signal distinguish this from the mild discomfort of stretching tight muscles. Dizziness or lightheadedness, particularly when moving from seated to standing positions, requires you to slow down and allow blood pressure to adjust.
Joint instability a sense that a joint might give out or is loose means you need more chair support or should skip that particular pose. Pre-existing medical conditions like recent surgery, uncontrolled high blood pressure, severe osteoporosis, or balance disorders require you to consult your healthcare provider before starting chair yoga.
Always modify poses to match your current ability level. Using more or less chair support, reducing range of motion, or holding poses for shorter durations are all appropriate modifications.
Warming up: gentle joint circles and breathing
Warmup for chair yoga prepares your body for movement over 2-3 minutes. Start seated in your chair with feet flat on the floor. Begin with slow diaphragmatic breathing 5-10 deep breaths filling your belly then chest, exhaling completely.
Progress to gentle joint circles: shoulder rolls (5 forward, 5 back), neck circles (3 in each direction, moving slowly), wrist circles (10 in each direction), ankle circles (10 in each direction). These movements lubricate joints with synovial fluid and warm the muscles around each joint.
Finish your warmup with a few gentle spinal movements: seated cat-cow (5 rounds) to warm the spine in flexion and extension.
Breathing Techniques: The Foundation of Practice
Diaphragmatic breathing basics
Diaphragmatic breathing is breathing that engages the diaphragm muscle, causing the belly to expand on inhale and contract on exhale. This is the foundation breathing pattern for all chair yoga practice.
To practice diaphragmatic breathing, sit upright in your chair with feet flat on the floor and spine gently lifted. Place one hand on your belly and one hand on your chest. Inhale slowly through your nose, directing the breath into your belly so the lower hand rises while the upper hand stays relatively still. Exhale through slightly parted lips or your nose, feeling your belly soften and lower.
This breathing pattern engages your diaphragm muscle, increases oxygen exchange, activates the parasympathetic nervous system, and provides core stability. Research on guided breathing exercises indicates improved lung capacity and calmer nervous system response, even when practiced seated.
Practice this for 2-3 minutes at the start of each chair yoga session to establish your breath foundation.
Box breathing for calming (4-4-4-4 pattern)
Box breathing is a paced breathing technique where you inhale for four counts, hold for four counts, exhale for four counts, and pause for four counts before repeating. This creates a box-shaped rhythm that calms the nervous system.
To practice box breathing in your chair, sit upright with shoulders relaxed. Inhale through your nose for a count of four. Hold your breath for four counts (with lungs full, throat open don't strain). Exhale slowly for four counts. Hold your breath out for four counts (with lungs empty, relaxed). Repeat this cycle 5-10 times.
Studies of yogic breath techniques show this kind of paced pattern relaxes your body's stress-response system by increasing heart rate variability and activating vagal tone. Use box breathing before bed, during stressful moments, or as part of your evening relaxation sequence.
Counted breath for stress reduction
Counted breath for stress reduction involves extending your exhale beyond your inhale length. This extended exhale activates the parasympathetic nervous system more strongly than balanced breathing.
Start with a comfortable seated position, feet grounded, spine upright. Inhale through your nose for a count of four. Exhale through your nose or mouth for a count of six to eight. Keep your breathing smooth and controlled never forced or strained. Repeat for 10-20 breath cycles.
As you become comfortable with 4:6 or 4:8 ratio, you can extend further: inhale for 5, exhale for 10. The key is keeping your exhale longer than your inhale without creating strain or gasping for air.
This technique is particularly beneficial when your mind is racing, you feel anxious, or you need to prepare for sleep.
Coordinating breath with movement
Breath-movement coordination connects your inhale and exhale to specific movement phases. This coordination is fundamental to all yoga practice, including chair yoga.
The general principle: inhale on movements that open, expand, or lift; exhale on movements that close, contract, or lower. For example, inhale as you lift your arms overhead, exhale as you lower them. Inhale as you arch your spine in cat-cow, exhale as you round it.
To practice coordination, start in seated mountain pose. Inhale, raising both arms out to the sides and overhead. Exhale, lowering your arms back down. Repeat 5-10 times, making the movement match the breath duration exactly. Your movement should never be faster or slower than your breath they move together.
This coordination deepens body awareness, improves focus, and creates a meditative quality in your practice.
Seated Chair Yoga Poses (15 Essential Poses)

The 15 seated chair yoga poses progress from foundational alignment (seated mountain) to mobility (cat-cow, side bend, twist), stretching (forward fold, pigeon), strengthening (boat, heel raises), and relaxation (savasana). This ordering follows the principle of building from foundation to complexity.
1. Seated mountain pose: establishing foundation
Seated mountain pose is the foundational seated position from which all other seated poses begin. This pose establishes proper alignment, postural awareness, and grounding.
To practice seated mountain pose, sit toward the front edge of your chair with feet flat on the floor, hip-width apart. Press all four corners of each foot into the floor. Engage your legs gently. Lengthen your spine upward, imagining a string pulling the crown of your head toward the ceiling. Roll your shoulders back and down, opening your chest. Rest your hands on your thighs, palms down or up. Soften your facial muscles and gaze forward gently.
Hold for 5-10 breaths, focusing on the sensation of grounding through your feet and lengthening through your spine. This pose builds postural awareness and core engagement.
2. Seated cat-cow: spinal mobility
Seated cat-cow is a spinal mobility exercise that moves your spine through flexion (cat) and extension (cow), warming the vertebral joints and releasing spinal tension.
From seated mountain pose, place your hands on your knees or the sides of the chair seat. On your inhale, arch your spine, lifting your chest and tilting your pelvis forward look slightly upward (cow position). On your exhale, round your spine, tucking your pelvis under and bringing your chin toward your chest (cat position).
Move slowly with your breath for 8-10 rounds. Focus on articulating each vertebra rather than just moving your upper back. This pose improves spinal mobility, counteracts prolonged sitting posture, and serves as an excellent warmup.
3. Seated forward fold: hamstring stretch
Seated forward fold is a forward-bending pose that stretches the hamstrings, lower back, and spine while promoting relaxation.
From seated mountain pose, inhale to lengthen your spine. On your exhale, hinge forward from your hips (not your lower back), reaching your hands toward your shins, ankles, or the chair seat. Keep your spine as long as possible rather than rounding excessively. Let your head and neck relax. Hold for 5-8 breaths, allowing gravity to deepen the stretch gradually.
To exit, inhale and use your hands on your thighs to press back up to seated position. If you have very tight hamstrings, use a yoga strap or towel looped around your feet to extend your reach. This pose stretches the posterior chain and calms the nervous system.
4. Seated twist: spinal rotation and digestion
Seated twist is a rotational pose that improves spinal mobility in rotation, massages abdominal organs, and aids digestion.
From seated mountain pose, place both feet flat on the floor. On an inhale, lengthen your spine. On your exhale, turn your upper body to the right, placing your left hand on your right thigh and your right hand on the back of the chair or the seat behind you. Inhale to lengthen, exhale to twist slightly deeper. Keep your hips facing forward the twist comes from your spine, not your hips. Hold for 5-8 breaths, then return to center on an inhale and repeat on the opposite side.
This pose improves thoracic spine rotation, stimulates digestive organs, and releases tension in the mid and upper back.
5. Seated side bend: lateral flexibility
Seated side bend is a lateral flexion pose that stretches the intercostal muscles between your ribs and the muscles along your side body.
From seated mountain pose, inhale and raise both arms overhead. On your exhale, reach both arms to the right, allowing your torso to lean right while keeping your left sitting bone grounded on the chair. You can place your right hand on the chair seat or armrest for support. Feel the stretch along your entire left side from hip to fingertips. Hold for 5-8 breaths, then inhale back to center and repeat on the left side.
For a gentler version, keep one hand on your thigh instead of raising both arms. This pose improves lateral spinal flexibility and opens the sides of the ribcage for fuller breathing.
6. Seated eagle arms: shoulder and upper back
Seated eagle arms is an arm position that stretches the shoulders and upper back, particularly beneficial for releasing tension from desk work and computer use.
From seated mountain pose, extend both arms forward at shoulder height. Cross your right arm under your left arm at the elbows. Bend both elbows so your forearms point upward. Wrap your forearms around each other, bringing your palms together if possible (or press the backs of your hands together if palms don't meet). Lift your elbows slightly and draw your shoulder blades down your back. Hold for 5-8 breaths, feeling the stretch across your upper back and between your shoulder blades. Release and repeat with left arm under right.
This pose releases upper back tension, stretches the rotator cuff muscles, and improves shoulder mobility.
7. Seated pigeon: hip opener
Seated pigeon is a hip-opening pose that stretches the external hip rotators and glutes, areas that often become tight from prolonged sitting.
From seated mountain pose, move to the front edge of your chair. Cross your right ankle over your left knee, creating a figure-4 shape with your legs. Flex your right foot to protect your knee. For a deeper stretch, hinge forward from your hips, keeping your spine long. Place your hands on your shins or the chair seat. Hold for 8-10 breaths, feeling the stretch in your right hip and glute. Return to upright, uncross your legs, and repeat on the opposite side.
If this position is too intense, keep your torso upright rather than folding forward. This pose releases hip tension and can help alleviate lower back discomfort related to tight hips.
8. Seated warrior: strength and focus
Seated warrior is a strengthening pose that builds leg engagement and focus while teaching the warrior stance in a supported position.
Sit sideways in your chair with your right hip toward the chair back. Step your right foot forward (outside the chair base if space allows) and extend your left leg back with foot flat or on the ball of the foot. Engage both legs strongly. Raise your arms overhead or bring them to heart center in prayer position. Sit tall, engaging your core. Hold for 5-8 breaths, building heat and strength in your legs. Then switch sides.
This pose builds leg strength, improves hip flexibility, and develops concentration and balance in a supported environment.
9. Seated side leg stretch: outer thigh reach
Seated side leg stretch is a combination pose that stretches the outer hip and side body while building leg awareness.
From seated mountain pose, extend your right leg out to the right side, keeping your foot flat on the floor with toes pointing forward or slightly outward. Inhale and raise your left arm overhead. Exhale and lean your torso toward the right (toward your extended leg), lowering your right hand to the chair seat or your shin. Feel the stretch along your left side and outer left hip. Hold for 5-8 breaths, then return to center and repeat on the opposite side.
This pose stretches the IT band, outer hip muscles, and side body while maintaining seated stability.
10. Seated chair boat: core challenge
Seated chair boat is a core-strengthening pose that builds abdominal strength and hip flexor engagement.
Sit near the front edge of your chair and hold the sides of the seat for support. Lean back slightly from your hips (not collapsing your lower back), engaging your core muscles. Lift one foot off the floor, then the other, or both together if you can maintain balance. You can keep your knees bent or straighten your legs for more challenge. Hold for 5-10 breaths, breathing smoothly despite the core engagement. Lower your feet and rest.
This pose strengthens your core, improves balance, and builds functional abdominal strength for daily activities.
11. Seated chest opener: upper-body opening
Seated chest opener is a pose that counteracts rounded-shoulder posture by opening the chest and strengthening the upper back.
From seated mountain pose, reach both arms behind your back and interlace your fingers. Straighten your arms and draw your hands away from your body, squeezing your shoulder blades together. Lift your chest, keeping your chin level (not jutting forward). Hold for 5-8 breaths, feeling the stretch across your chest and front shoulders. Release and shake out your arms.
This pose opens the pectoralis muscles, strengthens the rhomboids and middle trapezius, and improves postural alignment.
12. Seated wrist and finger stretch: desk-friendly relief
Seated wrist and finger stretch releases tension in the hands, wrists, and forearms essential for anyone who types, uses a mouse, or performs repetitive hand activities.
From seated mountain pose, extend your right arm forward with palm facing down. Use your left hand to gently pull your right fingers down and toward you, creating a stretch on the top of your forearm and wrist. Hold for 15-30 seconds. Then rotate your right palm to face up and use your left hand to gently pull your fingers back, stretching the underside of your forearm. Hold for 15-30 seconds. Repeat with your left hand.
For finger stretches, spread all fingers wide, hold for 5 seconds, then make a fist, hold for 5 seconds. Repeat 5 times. This pose prevents and relieves carpal tunnel symptoms, reduces hand fatigue, and maintains wrist mobility.
13. Seated heel raises: ankle and calf activation
Seated heel raises strengthen the calf muscles and improve ankle stability and circulation in the lower legs.
From seated mountain pose with feet flat on the floor, inhale and lift both heels so you balance on the balls of your feet. Exhale and lower your heels slowly. Repeat 10-15 times at a controlled pace, coordinating the lift with your inhale and the lower with your exhale.
For increased challenge, pause at the top of the lift for 2-3 seconds before lowering. This pose strengthens the calves, improves ankle stability, and helps prevent ankle rolling or weakness.
14. Seated chair sun salutation variation: full-body flow
Seated chair sun salutation is a flowing sequence that moves through multiple positions in coordination with breath, creating a complete warmup or short practice.
From seated mountain pose: Inhale, raising your arms overhead (upward reach). Exhale, folding forward into seated forward fold. Inhale, lifting partway up to lengthen your spine (half lift). Exhale, folding forward again. Inhale, transitioning into seated cat-cow arch. Exhale, seated cat-cow round. Inhale, lifting your torso and raising your arms overhead. Exhale, lowering your hands to your thighs, returning to seated mountain.
Repeat this sequence 5-8 times, moving slowly and smoothly with your breath. This flowing practice warms the entire body, coordinates breath and movement, and serves as a complete mini-practice on busy days.
15. Supported seated savasana: relaxation
Supported seated savasana is the final relaxation pose that allows your nervous system to integrate the benefits of your practice.
Sit back in your chair with support behind your back if available. Rest your feet flat on the floor, hip-width apart. Place your hands in your lap, on your thighs, or on armrests wherever they rest comfortably without effort. Close your eyes or soften your gaze downward. Release all muscular effort, allowing your body to be held by the chair. Breathe naturally, making no effort to control your breath.
Stay in this position for 2-5 minutes, allowing your heart rate to settle, your breath to normalize, and your mind to settle. This pose integrates the benefits of practice, reduces stress, and allows for restoration.
Standing Chair Yoga Poses (15 Supportive Poses)

The 15 standing chair yoga poses progress from basic standing alignment (chair-supported mountain) to flexibility (forward fold, triangle), strength (squats, lunges), and balance (tree, warrior III). These poses use the chair for support while building standing stability, strength, and confidence.
1. Chair-supported mountain pose
Chair-supported mountain pose establishes proper standing alignment while using the chair for light balance support.
Stand behind your chair and hold the backrest lightly with both hands. Step your feet hip-width apart, distributing weight evenly across all four corners of each foot. Engage your legs, feeling them firm but not locked. Lengthen your spine, imagining the crown of your head reaching toward the ceiling. Draw your shoulder blades back and down, opening your chest. Hold for 8-10 breaths, using minimal hand pressure on the chair just enough for confidence.
This pose builds awareness of proper standing posture and provides a foundation for all other standing poses.
2. Chair-supported forward fold
Chair-supported forward fold is a standing forward bend that stretches the hamstrings and lower back while the chair provides support and controls the depth of the stretch.
Stand behind your chair, holding the backrest with both hands. Step your feet hip-width apart. Inhale to lengthen your spine. On your exhale, hinge forward from your hips, keeping your hands on the chair back for support. Let your head and neck relax. Keep a slight bend in your knees if your hamstrings are tight. Hold for 8-10 breaths, allowing gravity to deepen the stretch. To exit, press into the chair back and slowly roll up to standing on an inhale.
This pose stretches the entire posterior chain (calves, hamstrings, glutes, spine) while building confidence in forward bending.
3. Chair warrior variations
Chair warrior variations bring the strengthening and focusing benefits of warrior poses to a supported format.
For warrior I variation, stand behind your chair and hold the backrest lightly. Step your right foot forward and left foot back, turning your left heel in slightly. Bend your right knee over your right ankle. Keep your hips facing forward. Raise your arms overhead if comfortable, or keep hands on the chair back. Hold for 5-8 breaths, building strength in your legs. Repeat on the opposite side.
For warrior II variation, stand to the side of your chair with your right hand on the backrest. Step your feet wide, right foot pointing forward, left foot turned in slightly. Bend your right knee over your ankle. Extend your left arm out to the side or place your left hand on your hip. Gaze over your right hand. Hold for 5-8 breaths, then switch sides.
These poses build leg strength, improve hip flexibility, and develop focus and stamina.
4. Chair tree pose: balance with support
Chair tree pose is a balance pose that builds single-leg stability while the chair provides a safety backup, reducing fear and allowing you to work on balance progressively.
Stand behind your chair, holding the backrest lightly with one or both hands. Shift your weight onto your right foot, rooting down through all four corners. Lift your left foot and place it on your right inner ankle, calf, or inner thigh (never on the knee joint itself). Flex your left foot to protect your knee. Find your balance with light hand support. Hold for 5-10 breaths, then lower your left foot and repeat on the opposite side.
As your balance improves, reduce hand contact with the chair try one hand, then fingertips, then hands in prayer at your chest, then eventually one hand or both hands lifted. This pose builds ankle and leg strength, improves balance, and increases confidence in single-leg standing.
5. Chair triangle pose
Chair triangle pose is a lateral bend that stretches the side body, hamstrings, and hips while the chair provides support and helps you maintain proper alignment.
Position yourself sideways to your chair with the chair on your right. Step your feet wide apart, right foot pointing forward, left foot turned in slightly. Inhale and raise both arms out to the sides. Exhale and reach your right hand toward the chair seat or backrest, allowing your torso to tip to the right. Extend your left arm upward toward the ceiling or rest it on your hip. Keep both legs straight. Hold for 5-8 breaths, feeling the stretch along your left side. Return to upright on an inhale and repeat on the opposite side.
This pose stretches the hamstrings, side body, and hips while building balance and strength.
6. Chair-supported lunges
Chair-supported lunges build leg strength and hip flexibility while the chair provides stability during this challenging position.
Stand behind your chair, holding the backrest with both hands. Step your right foot back into a lunge position with your left knee bent over your left ankle and your right leg extended behind you. Keep your right heel lifted or lower it toward the floor for a deeper calf stretch. Hold your torso upright, engaging your core. Hold for 5-8 breaths, feeling the work in your front leg and the stretch in your back hip flexor. Step forward to standing and repeat on the opposite side.
This pose strengthens the quadriceps and glutes, stretches the hip flexors, and improves balance and stability.
7. Chair-assisted squats
Chair-assisted squats are a functional strength exercise that builds leg strength using the chair for balance support and depth control.
Stand facing your chair, holding the backrest lightly with both hands. Step your feet hip-width apart or slightly wider, toes pointing forward or slightly outward. Inhale to prepare. Exhale and bend your knees, lowering your hips as though sitting back toward the chair seat (hovering above the seat without sitting). Keep your knees tracking over your toes, chest lifted, weight in your heels. Inhale and press through your heels to stand back up.
Repeat 8-12 times at a controlled pace. This exercise builds functional leg strength for daily activities like standing from a chair, climbing stairs, and preventing falls.
8. Chair-supported wide-leg forward bend
Chair-supported wide-leg forward bend is a deep stretch for the hamstrings, inner thighs, and lower back with the support of the chair providing safety and controlling stretch depth.
Stand behind your chair, holding the backrest with both hands. Step your feet wider than hip-width apart, toes pointing forward or slightly outward. Inhale to lengthen your spine. Exhale and hinge forward from your hips, maintaining hold of the chair back. Let your head hang, releasing tension in your neck. Hold for 8-10 breaths, feeling the stretch across your hamstrings, inner thighs, and lower back. To exit, press into the chair back and slowly roll up to standing on an inhale.
This pose provides a deep stretch for the posterior chain and inner thighs while building hip flexibility.
9. Standing side-bend with chair support
Standing side-bend with chair support stretches the intercostal muscles and side body while the chair provides stability.
Stand to the right side of your chair, placing your right hand lightly on the chair backrest. Root your feet hip-width apart. Inhale and raise your left arm overhead. Exhale and lean away from the chair (to your left), creating a lateral bend through your torso. Keep both feet grounded and both legs engaged. Hold for 5-8 breaths, feeling the stretch along your right side. Return to upright on an inhale and repeat on the opposite side.
This pose stretches the intercostals, obliques, and latissimus dorsi, improving lateral spinal flexibility.
10. Chair-supported standing calf raises
Chair-supported standing calf raises strengthen the calf muscles and improve ankle stability with the benefit of standing (weight-bearing) position for greater strengthening effect than the seated version.
Stand behind your chair, holding the backrest lightly for balance. Step your feet hip-width apart. Inhale and rise onto the balls of both feet, lifting your heels as high as comfortable. Exhale and lower your heels slowly back to the floor. Repeat 12-15 times at a controlled pace.
For increased challenge, pause at the top for 2-3 seconds before lowering, or try single-leg calf raises. This exercise strengthens the calves, improves ankle stability, and enhances balance.
11. Supported standing spinal twist
Supported standing spinal twist brings the benefits of spinal rotation to a standing position, using the chair for support and leverage.
Stand with your chair to your right, placing both hands on the chair backrest. Step your left foot slightly back. Rotate your torso to the right, using your hand placement on the chair to support and gently deepen the twist. Keep your hips facing forward the rotation comes from your spine. Hold for 5-8 breaths, then return to center and repeat on the opposite side.
This pose improves thoracic rotation, releases spinal tension, and massages the internal organs.
12. Chair-assisted side leg lift
Chair-assisted side leg lift strengthens the hip abductors (gluteus medius and minimus) which are essential for balance, stability, and preventing hip issues.
Stand behind your chair, holding the backrest for balance. Shift your weight onto your right leg, engaging it fully. Lift your left leg out to the side, keeping your foot flexed and toes pointing forward. Keep your torso upright don't lean away from the lifted leg. Hold for 2-3 breaths, then lower. Repeat 8-10 times, then switch sides.
This exercise strengthens the outer hip muscles, improves balance, and helps prevent the hip weakness common in older adults.
13. Supported standing pigeon variation
Supported standing pigeon variation provides the hip-opening benefits of pigeon pose in a standing position with chair support for balance and safety.
Stand behind your chair, holding the backrest for stability. Place your right foot on the chair seat (or just the outer edge of the seat) with your right knee bent and foot flexed. Your right shin may be parallel to the chair front or angled. Keep your left (standing) leg strong. Lean slightly forward from your hips to deepen the stretch in your right hip. Hold for 8-10 breaths, feeling the stretch in your right hip and glute. Step down and repeat on the opposite side.
If placing your foot on the seat is too high, place it on a lower surface like a step or yoga block. This pose opens the hips, stretches the external rotators, and improves hip flexibility.
14. Chair-supported warrior III variation
Chair-supported warrior III variation is a balance and strength pose that builds single-leg stability, core strength, and focus while the chair provides safety.
Stand behind your chair, holding the backrest with both hands. Shift your weight onto your right leg, engaging it strongly. Hinge forward from your hips and lift your left leg behind you until your torso and left leg form approximately a T-shape (or as close as you can achieve). Keep your hips level. Hold for 5-8 breaths, maintaining core engagement and smooth breathing. Lower your left leg and return to standing. Repeat on the opposite side.
This pose strengthens the standing leg, glutes, core, and back muscles while developing balance and body awareness.
15. Chair-supported heel-to-toe balance walk
Chair-supported heel-to-toe balance walk is a dynamic balance exercise that improves proprioception, ankle stability, and walking balance.
Stand behind your chair, holding the backrest lightly for support. Shift your weight onto your right foot. Step forward with your left foot, placing your left heel directly in front of your right toes (heel-to-toe position). Pause for 1-2 seconds to find your balance. Shift your weight forward onto your left foot. Bring your right foot forward, placing your right heel directly in front of your left toes. Continue walking forward in this heel-to-toe pattern for 5-10 steps, using the chair for light support.
This exercise improves balance during walking, strengthens stabilizer muscles, and builds confidence in dynamic movement.
Creating Your Chair Yoga Practice

Creating your chair yoga practice involves combining breathing techniques, seated poses, and standing poses into sequences that match your available time and current goals. The following four sample sequences provide templates for 10-minute, 15-minute, 20-minute, and 25-minute practices.
10-minute gentle morning routine
The 10-minute gentle morning routine is designed to wake up your body, improve mobility, and establish a positive mindset for the day.
Minutes 0-2: Seated diaphragmatic breathing (10-15 breaths), focusing on filling your belly and chest completely.
Minutes 2-3: Seated mountain pose, establishing grounding and postural awareness.
Minutes 3-5: Seated cat-cow (8-10 rounds), warming your spine through flexion and extension.
Minutes 5-6: Seated side bends (4 rounds total, 2 per side), opening the side body.
Minutes 6-7: Seated eagle arms (hold 30 seconds per side), releasing shoulder and upper back tension.
Minutes 7-8: Seated heel raises (15-20 repetitions), activating your calves and improving ankle circulation.
Minutes 8-9: Chair-supported forward fold (standing, holding for 8 breaths), stretching your hamstrings and lower back.
Minutes 9-10: Supported seated savasana, allowing your body to integrate the practice benefits.
This routine prepares your body for the day while remaining gentle enough for first thing in the morning.
15-minute stress-relief sequence
The 15-minute stress-relief sequence uses breathwork, gentle stretching, and relaxation poses to calm your nervous system and reduce tension.
Minutes 0-2: Box breathing (4-4-4-4 pattern) for 10-12 rounds, shifting your nervous system toward calm.
Minutes 2-4: Seated mountain pose transitioning into gentle neck and shoulder rolls.
Minutes 4-6: Seated twist (hold 5 breaths per side, repeat twice), releasing spinal tension.
Minutes 6-8: Seated pigeon (hold 8 breaths per side), opening hips where stress accumulates.
Minutes 8-10: Standing side-bend with chair support (hold 5 breaths per side, repeat twice), stretching the side body.
Minutes 10-11: Chair-supported mountain pose (standing, hold 8 breaths), grounding and centering.
Minutes 11-12: Chair triangle pose (hold 5 breaths per side), creating space in the body.
Minutes 12-15: Supported seated savasana with counted breath (exhale longer than inhale), deepening relaxation.
This sequence is ideal for midday stress relief, after work unwinding, or evening preparation for sleep.
20-minute strength-focused practice
The 20-minute strength-focused practice emphasizes poses that build muscle strength, particularly in the core and legs, while maintaining the breath-movement connection.
Minutes 0-3: Warmup with diaphragmatic breathing, gentle joint circles, and seated cat-cow.
Minutes 3-5: Seated heel raises (3 sets of 15 repetitions with 20-second rest between sets), building calf strength.
Minutes 5-6: Seated wrist and finger stretches, preventing repetitive strain.
Minutes 6-9: Seated chair boat (3 rounds of 30-second holds with 30-second rest between), strengthening your core.
Minutes 9-12: Chair-assisted squats (3 sets of 10 repetitions with 20-second rest between sets), building leg strength.
Minutes 12-15: Chair-supported lunges (hold 45 seconds per side, repeat twice), strengthening legs and opening hip flexors.
Minutes 15-17: Chair warrior variation (hold 8 breaths per side), building leg endurance.
Minutes 17-19: Chair-supported warrior III variation (hold 5 breaths per side), challenging balance and core strength.
Minutes 19-20: Brief supported seated savasana, allowing muscles to relax.
This practice builds functional strength for daily activities and improves metabolic health.
25-minute full-body flow
The 25-minute full-body flow combines breathing, seated work, standing work, and relaxation into a complete balanced practice.
Minutes 0-3: Diaphragmatic breathing and joint circles (shoulders, neck, wrists, ankles).
Minutes 3-7: Seated sequence mountain pose, cat-cow (8 rounds), side bends (4 rounds), eagle arms (hold 30 seconds per side).
Minutes 7-10: Seated stretching sequence forward fold (hold 8 breaths), twist (hold 6 breaths per side), pigeon (hold 8 breaths per side).
Minutes 10-13: Standing sequence preparation chair-supported mountain pose, forward fold (hold 8 breaths).
Minutes 13-17: Standing strength sequence chair-assisted squats (12 repetitions), lunges (hold 45 seconds per side), tree pose (hold 8 breaths per side).
Minutes 17-20: Standing balance sequence chair-supported side leg lift (8 repetitions per side), warrior III variation (hold 5 breaths per side), heel-to-toe balance walk (10 steps).
Minutes 20-22: Standing flexibility sequence triangle pose (hold 6 breaths per side), standing pigeon variation (hold 8 breaths per side).
Minutes 22-25: Closing sequence return to seated, seated twist (hold 5 breaths per side), shoulder opener, supported seated savasana (2 minutes).
This comprehensive practice addresses all fitness components: cardiovascular (through continuous movement), strength, flexibility, and balance.
Sequencing principles: warm to active to cool
Sequencing principles for chair yoga follow the same logic as traditional yoga: begin with warming and breathing, progress to active work (strength or deeper stretching), then cool down with gentler movements and relaxation.
Warm phase (first 10-20% of practice time): Focus on breath awareness, gentle joint movements, and establishing the mind-body connection. Include seated mountain pose, breathing techniques, and gentle spinal movements like cat-cow.
Active phase (middle 60-70% of practice time): Include your main work whether that's strength-building poses like chair squats and lunges, deeper stretches like pigeon and triangle, or balance challenges like tree and warrior III. This is where you build heat, challenge yourself, and develop your target skills.
Cool phase (final 10-20% of practice time): Gradually reduce intensity with gentle stretches, seated twists, and forward folds. Always end with at least 1-2 minutes of supported seated savasana to allow your nervous system to shift into rest mode and integrate the practice benefits.
This sequencing prevents injury, maximizes benefits, and leaves you feeling energized yet calm at the end of your practice.
Progressive Practice: Beginner to Intermediate
.avif)
Progressive practice for chair yoga means starting with foundational poses and shorter holds, then gradually increasing duration, depth, intensity, and challenge over weeks and months. This section outlines a 12-week progression plan.
Weeks 1-2: learning foundational poses
Weeks 1-2 focus on learning proper form for seated poses only, establishing the breath-movement connection, and building the habit of regular practice.
Practice seated poses only: mountain pose, cat-cow, side bends, eagle arms, forward fold, and seated twist. Hold poses for 15-20 seconds initially, focusing on correct alignment rather than depth. Practice breathing techniques for 2-3 minutes at the start of each session.
Practice frequency: 2-3 times per week, 10-15 minutes per session. Rest when you feel tired. The goal is familiarity with the poses and comfort with the chair as your support system, not pushing limits.
Weeks 3-4: holding poses longer, adding breath
Weeks 3-4 involve extending hold times and incorporating breath-movement coordination.
Continue with seated poses, now holding for 30-45 seconds. Add diaphragmatic breathing practice at the start (5 minutes). Begin coordinating breath with movement in cat-cow and other flowing poses. Start incorporating box breathing at the end of practice.
Add seated pigeon, seated chair boat, and heel raises to your repertoire. Practice frequency increases to 3-4 times per week, 15-20 minutes per session. You should notice improved flexibility in your hips and spine by the end of week 4.
Weeks 5-8: flowing between poses, deeper stretches
Weeks 5-8 introduce standing poses, flowing sequences, and deeper variations of stretches.
Begin incorporating standing poses with chair support: chair-supported mountain pose, forward fold, and tree pose. Create mini-flows: move from seated cat-cow into seated forward fold, hold, then return to seated mountain. Extend holds in stretching poses like pigeon and forward fold to 60 seconds or longer.
Add standing squats, lunges, and warrior variations. Practice frequency: 4-5 times per week, 20-25 minutes per session. By week 8, you should notice significant improvements in balance, leg strength, and confidence in standing poses.
Months 3+: more standing work, balance challenges
Month 3 and beyond introduces more challenging balance poses, reduces chair dependency where safe, and builds toward a sustainable long-term practice.
Increase the proportion of standing poses in your practice. Add warrior III variation, heel-to-toe balance walk, and standing pigeon variation. In tree pose, progress from two-hand support to one-hand support to fingertip support. Experiment with raising your arms overhead in standing poses where you previously kept hands on the chair.
Practice frequency: 4-6 times per week, 20-30 minutes per session, with one longer 40-45 minute practice if desired. Continue using the chair as safety backup the goal is not to eliminate chair support entirely but to use it wisely as you build strength and confidence.
Modifications and Adaptations
Modifications and adaptations make chair yoga accessible for women with specific limitations or conditions. The following sections address the most common modification needs.
For limited shoulder mobility
Limited shoulder mobility requires keeping arms lower and avoiding overhead reaching until shoulder flexibility improves.
Modifications for limited shoulder mobility include: In poses calling for arms overhead, keep arms at shoulder height or chest height instead. Use a yoga strap or towel held between hands to make eagle arms accessible hold the ends of a strap instead of wrapping forearms. In chest openers, interlace fingers behind your back but keep arms lower rather than straightening them fully.
Shoulder circles, gentle arm swings, and progressive stretching gradually improve shoulder range of motion over weeks of consistent practice.
For hip or knee sensitivity
Hip or knee sensitivity requires reducing range of motion and avoiding positions that compress or torque these joints.
Modifications for hip or knee sensitivity include: In seated pigeon, keep your torso more upright rather than folding forward deeply. Place a folded towel under your sitting bones to elevate your hips slightly, reducing hip flexion demands. In standing poses, reduce the depth of your knee bends partial squats and shallow lunges are perfectly valid and still build strength.
Never place your foot on your knee in tree pose only ankle, calf, or thigh. For forward folds, keep a generous bend in your knees to reduce hamstring and knee strain. Use a cushion under your knees in any position that causes knee discomfort.
For balance concerns
Balance concerns require keeping contact with the chair throughout balance poses and potentially using a wall for additional stability.
Modifications for balance concerns include: Position your chair near a wall so you have both chair and wall for support if needed. In tree pose, keep both hands on the chair back and place your lifted foot at ankle height only. In standing poses, widen your stance to create a broader base of support. Take smaller steps in heel-to-toe balance walk.
Always prioritize safety over depth or challenge building balance takes time, and practicing with appropriate support prevents falls and builds confidence.
For lower back issues
Lower back issues require maintaining spinal length, avoiding extreme flexion, and supporting the lumbar spine.
Modifications for lower back issues include: In forward folds, keep a generous bend in your knees and only fold as far as you can while maintaining a long spine avoid rounding your lower back. Place a small cushion behind your lower back when sitting to maintain your natural lumbar curve. In twists, focus on thoracic rotation rather than torquing your lower back.
Avoid seated positions that cause you to slump sit near the front edge of your chair where you can maintain upright posture. Strengthen your core with gentle boat pose to provide better support for your lower back over time.
Using props: blocks, straps, cushions
Props extend your reach, provide support, and make poses accessible when body proportions or flexibility limitations would otherwise prevent proper alignment.
Props and their uses in chair yoga include: Yoga blocks placed under your feet if your feet don't reach the floor when seated, preventing dangling legs and maintaining proper hip alignment. Yoga strap or belt looped around your feet in seated forward fold to extend your reach if you can't touch your feet or shins. Cushions placed behind your lower back to support your lumbar spine, under your sitting bones to elevate your hips, or under your feet to ground them.
Small hand towel or resistance band as an alternative to a yoga strap. Yoga blanket folded for cushioning in any position. Props are tools for accessibility, not crutches use them as needed to practice safely and effectively.
Chair Yoga for Stress and Sleep

Chair yoga for stress relief and sleep improvement uses specific breathing techniques, gentle poses, and relaxation practices that activate the parasympathetic nervous system and prepare your body for rest.
Evening relaxation sequence
The evening relaxation sequence is designed to release physical tension and calm your nervous system in preparation for sleep.
Practice this sequence 30-60 minutes before bed:
Minutes 0-3: Seated mountain pose with counted breath (inhale for 4, exhale for 6-8), repeating for 15-20 breath cycles.
Minutes 3-5: Gentle neck and shoulder rolls to release tension accumulated during the day.
Minutes 5-7: Seated side bends (4 rounds total, holding each for 5-8 breaths), releasing lateral tension.
Minutes 7-10: Seated forward fold (hold for 10-15 breaths), allowing gravity to create a gentle stretch and calm your nervous system.
Minutes 10-12: Seated twist (hold 8 breaths per side), releasing spinal tension and massaging internal organs.
Minutes 12-15: Supported seated savasana with extended exhale breathing, allowing complete relaxation.
Keep movement slow and gentle. Avoid standing poses or strengthening work in the evening focus entirely on release, stretch, and breath.
Breath work for calming nervous system
Breathwork for calming your nervous system uses specific breathing patterns that activate the vagus nerve and shift your body into parasympathetic (rest and digest) mode.
Three most effective calming breath techniques for chair yoga:
Box breathing (4-4-4-4 pattern): Described previously, this equal-ratio breathing calms your nervous system within 2-3 minutes of practice.
Extended exhale breathing: Inhale for 4 counts, exhale for 6-8 counts. The longer exhale activates your vagus nerve more strongly than the inhale, creating a calming effect. Practice for 10-15 breath cycles.
Alternate nostril breathing (if comfortable): This technique involves breathing in through one nostril and out through the other, alternating. While more advanced, it powerfully balances the nervous system.
A study found that 20-minute chair yoga sessions improved heart rate variability, indicating better nervous system regulation and stress resilience.
Gentle twists and forward folds for rest
Gentle twists and forward folds promote rest by releasing muscular tension in areas that hold stress (hips, spine) and by triggering the relaxation response.
Twists (seated twist, supported standing twist) release tension in the spine, particularly in the thoracic region where stress often manifests as upper back tightness. The gentle compression and release of abdominal organs during twisting stimulates the vagus nerve. Hold twists for 8-10 slow breaths, focusing on releasing tension with each exhale.
Forward folds (seated forward fold, chair-supported standing forward fold) create gentle compression of the abdomen which stimulates the parasympathetic nervous system. The inverted position (head below heart) has a naturally calming effect. Forward folds also stretch the hamstrings and lower back, areas where stress-related tension accumulates. Hold forward folds for 10-15 breaths, allowing gravity to deepen the stretch gradually.
Supported savasana (relaxation pose)
Supported savasana is the final relaxation pose that provides complete rest for your body and mind, allowing your nervous system to fully shift into restorative mode.
For seated savasana, sit back in your chair with back support if available. Rest your feet flat on the floor, hip-width apart, with your knees at approximately 90 degrees. Place your hands in your lap, on your thighs (palms up for receptivity, palms down for grounding), or on armrests. Close your eyes or soften your gaze downward.
Release all muscular effort in your face, jaw, shoulders, arms, belly, legs, and feet. Breathe naturally without trying to control your breath. Stay for 3-10 minutes. If your mind wanders, gently return attention to the sensations of your body being supported by the chair and floor.
Research reports participants describing better sleep quality and reduced fatigue after practicing yoga that includes relaxation components like savasana.
How Often to Practice Chair Yoga

Frequency of chair yoga practice determines the extent and speed of benefits you experience. More frequent practice yields faster improvements and greater cumulative benefits.
Minimum: 2x weekly for maintaining flexibility
Two sessions per week is the minimum frequency for maintaining current flexibility and joint mobility. Two 15-20 minute sessions prevent flexibility loss but produce only modest improvements.
Two weekly sessions maintain what you have but don't build significant new strength, balance, or flexibility. This frequency suits maintenance phases or periods when time is severely limited. Schedule these sessions at least 2-3 days apart for best results (e.g., Tuesday and Friday rather than Monday and Tuesday).
Optimal: 4-5x weekly for strength and stress benefits
Four to five sessions per week is the optimal frequency for building strength, improving flexibility, enhancing balance, and maximizing stress-reduction benefits.
At this frequency, your body has enough stimulus to adapt (building strength and flexibility) while having adequate recovery time. Four to five 20-30 minute sessions per week produce noticeable improvements in 4-6 weeks. This frequency builds momentum in your practice, deepens your mind-body connection, and makes chair yoga a core component of your wellness routine.
Daily: short 10-minute practices add up
Daily practice, even in short 10-minute sessions, creates powerful cumulative benefits through consistency and habit formation.
A 10-minute daily practice equals 70 minutes per week comparable to 4-5 longer sessions. Daily practice embeds chair yoga into your routine so thoroughly that it becomes automatic. Short daily sessions work well for busy schedules: 10 minutes before breakfast, during a work break, or before bed.
The disadvantage of very short daily sessions is insufficient time for both strengthening and stretching work in one session you may need to alternate focus days.
Combining with Wall Pilates or walking
Chair yoga combines effectively with other low-impact activities like Wall Pilates, walking, swimming, or cycling for comprehensive fitness.
Sample weekly combination schedule:
- Monday: Chair yoga (20 minutes)
- Tuesday: Walking (30 minutes)
- Wednesday: Chair yoga (20 minutes)
- Thursday: Wall Pilates (25 minutes)
- Friday: Chair yoga (20 minutes)
- Saturday: Walking (30 minutes)
- Sunday: Chair yoga gentle practice or rest
Chair yoga provides flexibility, balance, and mind-body connection. Walking provides cardiovascular fitness and bone density. Wall Pilates provides core strength and muscular endurance. Together, these activities create balanced fitness addressing all health components for women over 40.
Expected Results and Timeline
Expected results from consistent chair yoga practice follow a predictable timeline, though individual variation exists based on starting fitness level, frequency of practice, and other lifestyle factors.
Week 1-2: reduced stiffness and stress
Weeks 1-2 produce noticeable reduction in joint stiffness and improved stress management. You'll likely feel less tight when you wake up or after prolonged sitting. Your breathing becomes calmer and you may notice reduced muscle tension, particularly in shoulders and neck.
Mental benefits emerge early: improved mood, better stress response, and increased sense of control over your body. These early benefits reinforce motivation and habit formation.
Week 3-4: improved flexibility and range of motion
Weeks 3-4 bring measurable flexibility improvements. You'll reach farther in forward folds, twist more easily, and notice increased range of motion in hips and shoulders. Daily activities requiring flexibility (reaching overhead, bending to tie shoes, turning to look behind you) become easier.
Your balance may begin improving as proprioception develops and stabilizer muscles strengthen. You'll feel more stable in standing poses and may reduce chair support slightly.
Week 5-8: better balance and core strength
Weeks 5-8 produce significant balance and core strength improvements. You'll notice better stability when standing on one foot, less wobbling in balance poses, and increased confidence in dynamic movements. Core strength shows in improved posture, easier time standing from sitting, and reduced lower back fatigue.
Leg strength increases become noticeable: stairs feel easier, you can stand longer without fatigue, and chair-assisted squats feel less challenging.
Month 3+: significant posture improvement and confidence
Month 3 and beyond brings significant postural changes and psychological shifts. Your default posture improves you naturally sit and stand taller without conscious effort. Shoulder rounding decreases, forward head position corrects, and you occupy space with more confidence.
Psychologically, you feel more confident in your body's capabilities, less fearful of falling or injury, and more empowered to maintain your independence as you age. The practice has become a habit, and you notice when you miss sessions because your body and mind feel different without regular practice.
Taking Your Practice Further
Taking your chair yoga practice further means deepening your commitment through structured programs, consistent guided practice, community engagement, and progressive challenge.
Joining a structured Chair Yoga program
A structured Chair Yoga program provides systematic progression, expert instruction, and curriculum designed for steady improvement over weeks or months.
Structured programs offer professionally designed sequences that progress logically, preventing plateaus and reducing injury risk. Programs include instructional videos demonstrating proper form, explanations of modifications, and progressions to more challenging variations. Many programs provide printable guides, tracking tools, and support resources.
Research shows that group-based movement programs help older adults maintain consistency because structured accountability and planned progression remove the guesswork from practice.
Video-guided daily practices
Video-guided daily practices provide expert instruction, ensure proper form, and eliminate the need to plan your own sequences you simply press play and follow along.
Video guidance prevents the common problem of repeating the same routine until it becomes stale. Quality chair yoga videos demonstrate proper alignment, offer modifications, and pace the practice appropriately. Following along with an instructor creates an experience closer to an in-person class while maintaining the convenience of home practice.
Look for video programs specifically designed for women over 40 or older adults, as these address your specific needs and limitations more effectively than general yoga videos.
Community support and accountability
Community support provides motivation, accountability, reduces isolation, and offers opportunities to share challenges and successes with others on similar journeys.
Community can take many forms: joining a local chair yoga class, participating in online forums or Facebook groups focused on chair yoga for older adults, practicing with a friend or family member, or enrolling in a program with community features like group calls or forums.
Studies show that for older adults, the social dimension of fitness programs plays a major role in both attendance and enjoyment. Accountability to others increases consistency, and shared experience reduces the sense of being alone in your physical challenges.
Progressive challenges designed for your level
Progressive challenges prevent plateaus and maintain engagement by continuously adapting practice to your improving capabilities.
Progressive challenges in chair yoga include: holding poses longer (increasing from 5 breaths to 10 breaths to 20 breaths), reducing chair support in balance poses (two hands to one hand to fingertips to hands-free), increasing repetitions in strengthening poses (from 8 squats to 12 to 15), adding light resistance (1-2 kg hand weights in seated arm raises), and attempting more advanced variations (from bent-knee boat pose to straight-leg boat pose).
Progressive challenge should be gradual increase one variable at a time and maintain that level for 1-2 weeks before progressing further. Listen to your body and never progress at the expense of proper form or safety.
CONCLUSION
Chair yoga provides women over 40 with a comprehensive, accessible movement practice that builds strength, flexibility, balance, and stress resilience without requiring floor work or high-impact activity. The 30 poses presented in this guide progress from foundational alignment to dynamic balance, offering options for all fitness levels and physical limitations.
The key to success with chair yoga is consistency over intensity. Two to five weekly sessions of 15-30 minutes produce measurable improvements in flexibility, balance, strength, and stress management within 4-8 weeks. The progressive practice plan guides you from learning foundational poses in weeks 1-2 through increasingly challenging standing and balance work over months 3 and beyond.
Chair yoga's true value extends beyond physical benefits. The breath-movement coordination cultivates mind-body awareness that transfers to daily life. The accessibility of chair support builds confidence in movement for women who may have felt excluded from traditional fitness activities. The stress-reduction techniques provide tools for managing the emotional and psychological challenges of aging.
Begin where you are, use modifications as needed, practice consistently, and trust the process. Your body will respond with improved mobility, strength, and resilience, supporting your independence and quality of life for years to come.
Chair Yoga that meets you where you are.
Get your planSources
Yao, Teng, et al. "Effect of Chair Yoga Therapy on Functional Fitness and Daily Life Activities among Older Female Adults with Knee Osteoarthritis in Taiwan: A Quasi-Experimental Study." Healthcare, vol. 11, no. 7, 2023, p. 1024, https://doi.org/10.3390/healthcare11071024.
Woodyard, Catherine. "Exploring the Therapeutic Effects of Yoga and Its Ability to Increase Quality of Life." International Journal of Yoga, vol. 4, no. 2, 2011, p. 49, https://doi.org/10.4103/0973-6131.85485.
Banstola, D. "Effect of Yoga Breathing Exercises on Ventilatory Function." Journal of Gandaki Medical College-Nepal, vol. 9, no. 2, 2017, pp. 17–22, https://doi.org/10.3126/jgmcn.v9i2.17861.
Epe J, Stark R, Ott U. "Different Effects of Four Yogic Breathing Techniques on Mindfulness, Stress, and Well-being." OBM Integrative and Complementary Medicine, vol. 6, no. 3, 2021, p. 031, doi:10.21926/obm.icm.2103031.
Tyagi, Anupama, and Marc Cohen. "Yoga and Heart Rate Variability: A Comprehensive Review of the Literature." International Journal of Yoga, vol. 9, no. 2, 2016, p. 97, https://doi.org/10.4103/0973-6131.183712.
Taibi, Diana M., and Michael V. Vitiello. "A PILOT STUDY OF GENTLE YOGA FOR SLEEP DISTURBANCE IN WOMEN WITH OSTEOARTHRITIS." Sleep Medicine, vol. 12, no. 5, 2011, p. 512, https://doi.org/10.1016/j.sleep.2010.09.016.
Komatsu, H., Yagasaki, K., Saito, Y. et al. "Regular group exercise contributes to balanced health in older adults in Japan: a qualitative study." BMC Geriatrics, vol. 17, 2017, p. 190, https://doi.org/10.1186/s12877-017-0584-3.
Smith, Gabrielle L., et al. "The Association between Social Support and Physical Activity in Older Adults: A Systematic Review." The International Journal of Behavioral Nutrition and Physical Activity, vol. 14, 2017, p. 56, https://doi.org/10.1186/s12966-017-0509-8.
FAQs
How long does it take to see results from chair yoga?
You will see initial results from chair yoga within 1-2 weeks of consistent practice. Reduced joint stiffness, decreased muscle tension, and improved stress response typically appear in the first 2 weeks. Measurable flexibility improvements and increased range of motion emerge in weeks 3-4. Significant balance and core strength improvements become noticeable in weeks 5-8. Major postural changes and confidence shifts occur after 3 months of regular practice (3-5 sessions per week). Results depend on your starting fitness level, practice frequency, and consistency.
Can chair yoga help with arthritis pain?
Yes, chair yoga helps reduce arthritis pain and improve function in arthritic joints. [Research on older women with knee osteoarthritis](https://pmc.ncbi.nlm.nih.gov/articles/PMC10094373/) demonstrates that chair yoga improves strength, mobility, and daily function while reducing pain. Chair yoga maintains joint mobility through gentle range-of-motion movements without high-impact stress. The supported positions allow you to move arthritic joints safely. Strengthening exercises build muscle support around joints, reducing load and pain. Practice 3-4 times per week for best arthritis management results, modifying poses to stay within pain-free range of motion.
Is chair yoga effective for weight loss?
Chair yoga supports weight loss as part of a comprehensive approach but is not a primary weight loss exercise on its own. Chair yoga burns approximately 100-150 calories per 30-minute session (less than cardio exercises like walking or cycling). Chair yoga builds lean muscle mass which increases resting metabolic rate, helping you burn more calories throughout the day. The stress-reduction benefits help reduce cortisol-driven weight gain and emotional eating. For weight loss, combine chair yoga (3-4 weekly sessions) with walking or other cardio (3-4 weekly sessions) and maintain a slight caloric deficit through nutrition for best results.
What's the difference between chair yoga and regular yoga?
The difference between chair yoga and regular yoga is the use of a chair for support, making poses accessible to those with mobility, balance, or floor-transition limitations. Chair yoga adapts traditional yoga poses for seated practice or standing with chair support, eliminating the need to get up and down from the floor. Regular yoga typically requires mat work, floor transitions, and unsupported balance poses. Both practices share the same core principles: breath awareness, mindful movement, and mind-body connection. Chair yoga provides the same flexibility, strength, and stress-reduction benefits as regular yoga while being more accessible to women over 40, those with joint issues, balance concerns, or injuries.
Can I do chair yoga every day?
Yes, you can do chair yoga every day, and daily practice provides cumulative benefits through consistency. Daily 10-15 minute sessions create habit formation and provide 70+ minutes of weekly practice. Listen to your body and take rest days if you feel fatigued or sore. Vary your daily practice intensity: alternate between strength-focused sessions, flexibility-focused sessions, and gentle restorative sessions to allow recovery while maintaining daily practice. If practicing daily, ensure you include adequate warmup and avoid pushing into pain or excessive fatigue. Daily gentle practice is safe and beneficial; daily intense practice may lead to overuse without proper recovery.